Some mornings you have the time to blow-dry, curl, and style. Most mornings you don’t. The good news? A polished, professional-looking updo doesn’t actually require those mornings — it requires the right technique.
This guide walks you through one foolproof updo that takes literally five minutes and works on almost everyone: the twisted low chignon (also called a “tucked low bun” or “topsy-tail bun”). It’s the updo that professional stylists at Bob + Paige Salon, Glamsquad, and La’ James International College all teach as the gold-standard quick style — because it works on straight, wavy, and curly hair, on every length from shoulder to waist, and looks elegant enough for work, weddings, and dinners alike.
What You’ll Need
- 1 thin elastic that matches your hair color (or a clear one)
- 3–6 bobby pins matched to your hair color
- Dry shampoo (only if your hair is freshly washed)
- Flexible-hold hairspray or texture spray
- A regular paddle brush or wide-tooth comb
- Optional: a small mirror or phone in selfie mode to check the back
The Most Important Tip Before You Start
Don’t start with freshly washed hair. Day-old or even two-day-old hair holds an updo dramatically better than clean hair, because the natural oils give your strands grip. Per Bob + Paige stylist Jenna Crawford: “Wash your hair the day before, not the day of, because it’ll be too slippery and won’t hold well.”
If your hair is freshly washed, work some dry shampoo through the roots and mid-lengths first. This gives you the grip you need without a full wash.
Total Time: Under 5 Minutes
If you’ve never done this style before, expect 5–6 minutes on your first try. By your third attempt, you’ll be down to 3 minutes flat. The technique becomes muscle memory fast.
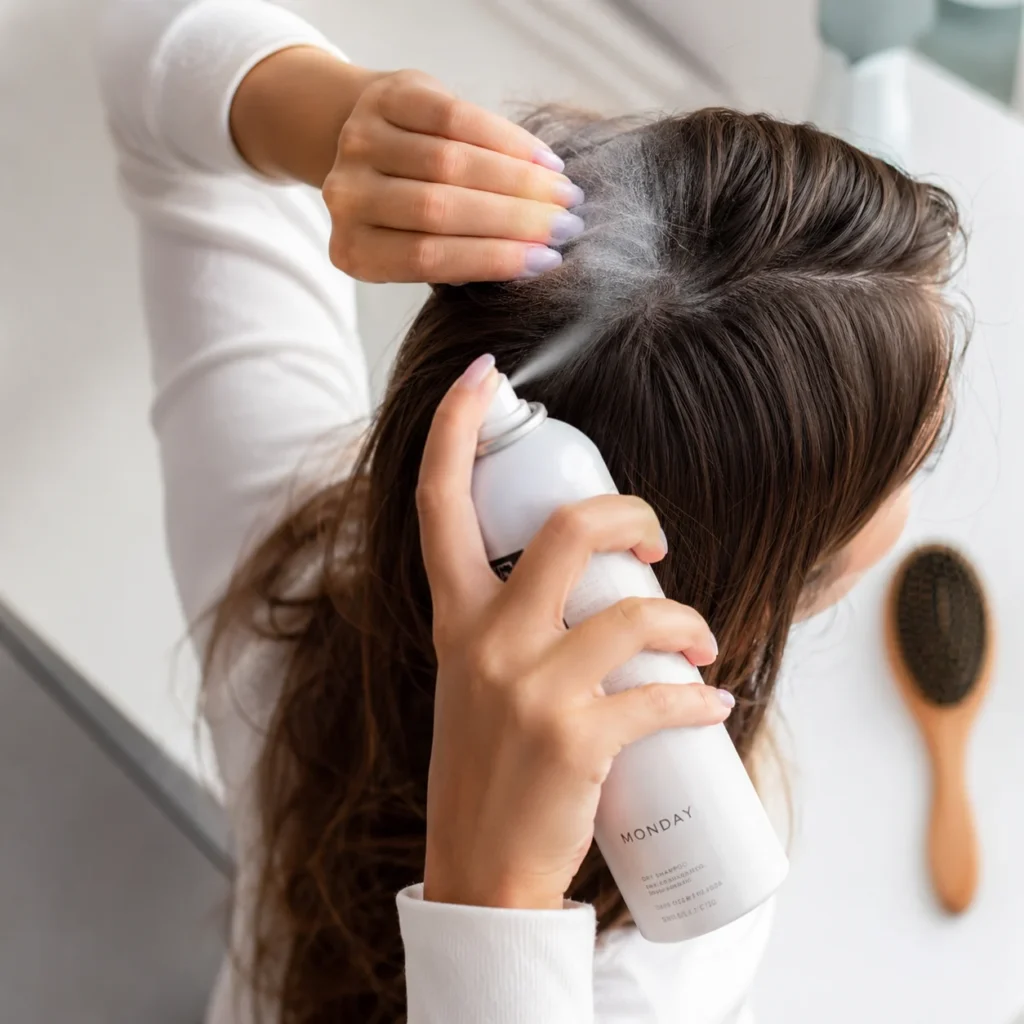
Step 1: Prep Your Hair (Day-Old Hair Works Best)
Time: 30 seconds
The biggest secret professional stylists agree on: don’t start with freshly washed hair. Jenna Crawford (senior stylist at Bob + Paige Salon) puts it simply — “You want hair that’s a little bit dirty. Wash your hair the day before, not the day of, because it’ll be too slippery and won’t hold well.”
If your hair is freshly washed or feels too smooth, spritz dry shampoo at the roots and shake it through. Then run a brush through to remove tangles. That’s it — no curling, no blow-drying needed.
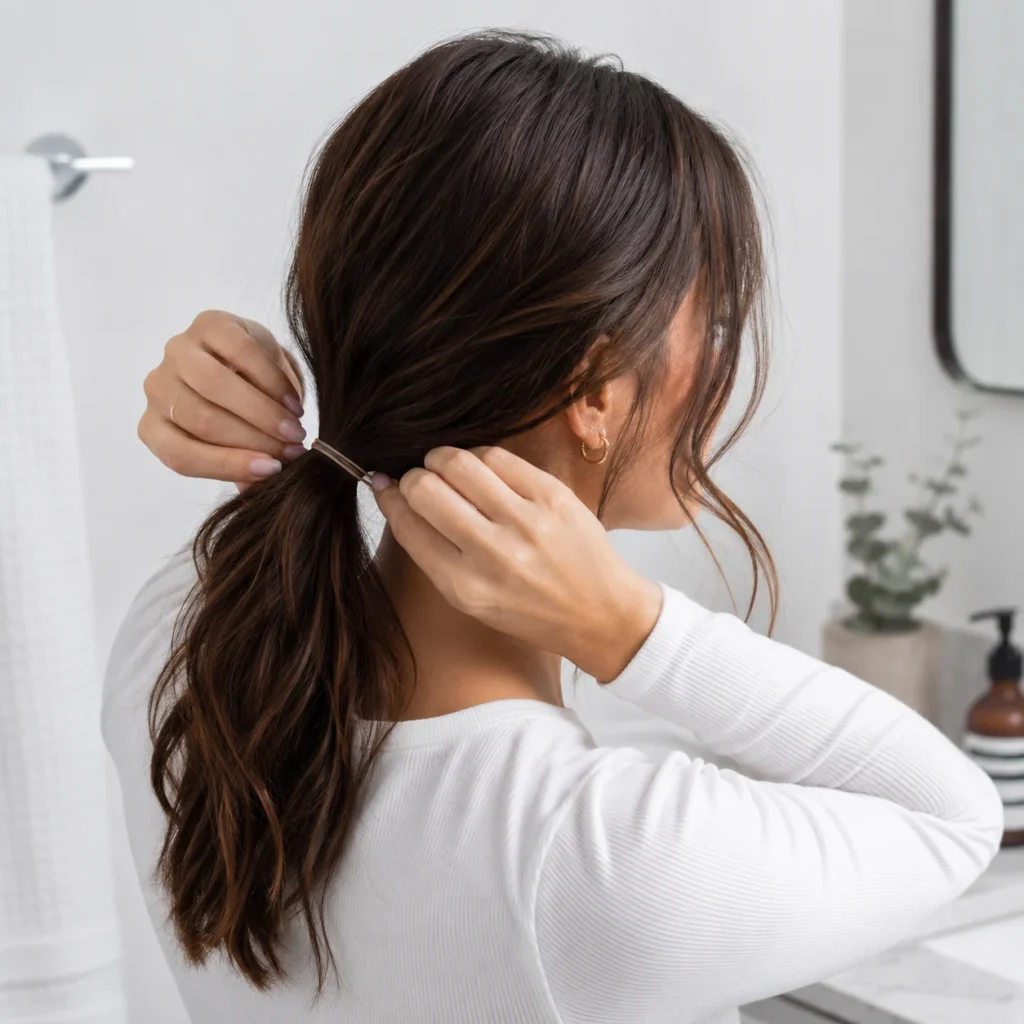
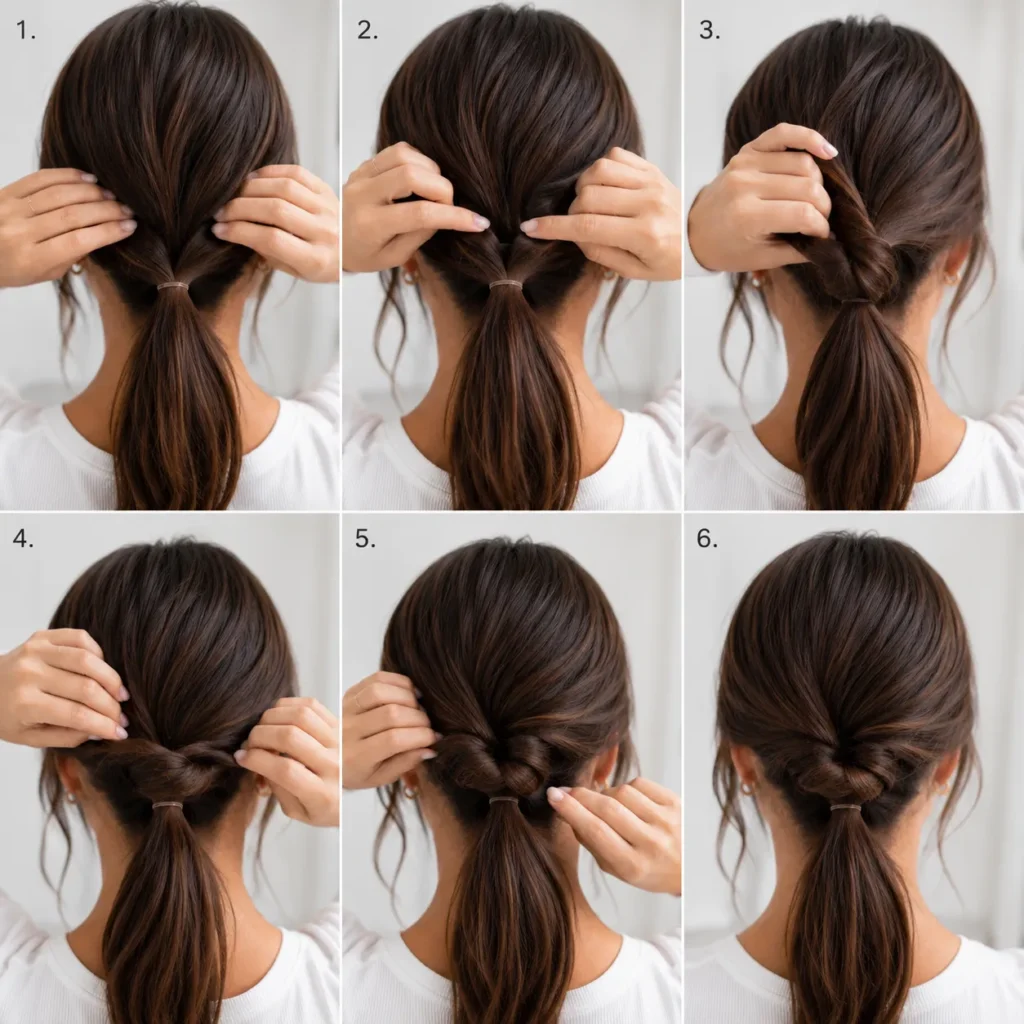
Step 2: Create a Low Ponytail
Time: 30 seconds
Gather all your hair at the nape of your neck — directly above where your head meets your neck, not high on your crown. This is the foundation of the entire updo, so it doesn’t need to be perfect. A few loose pieces around the face are good — they soften the final look.
Secure with a thin, color-matched elastic. Per stylist Jenna Crawford and Glamsquad’s 2026 quick-updo guide, the elastic should match your hair color or be clear so it disappears in the next step.
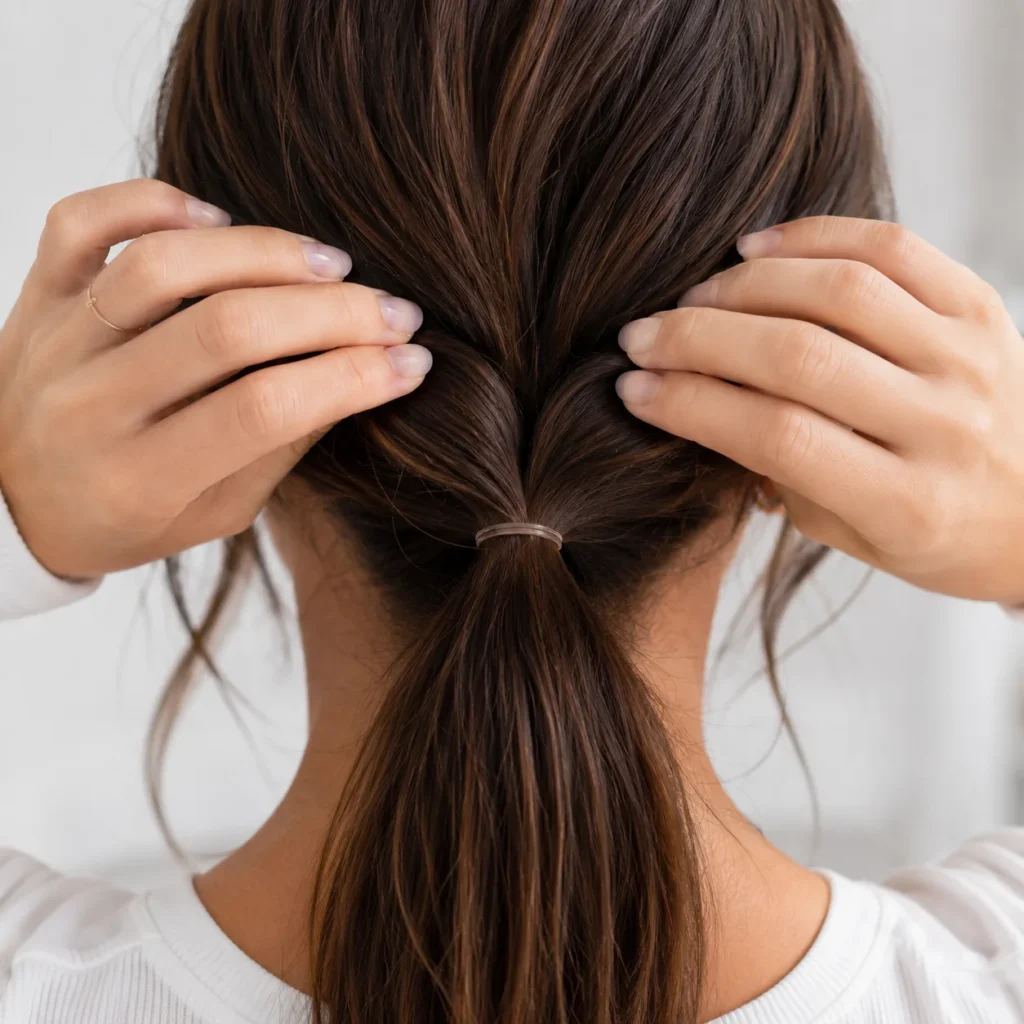
Step 3: Make a Hole Above the Elastic
Time: 15 seconds
Using your fingers, gently split the hair just above your elastic into two equal halves. You’re creating a small opening or “gap” above the elastic — like a pocket in your ponytail.
This is the move that turns a basic ponytail into the foundation of an elegant updo. It’s the technique salons call a “topsy-tail” or “topsy-turvy”.
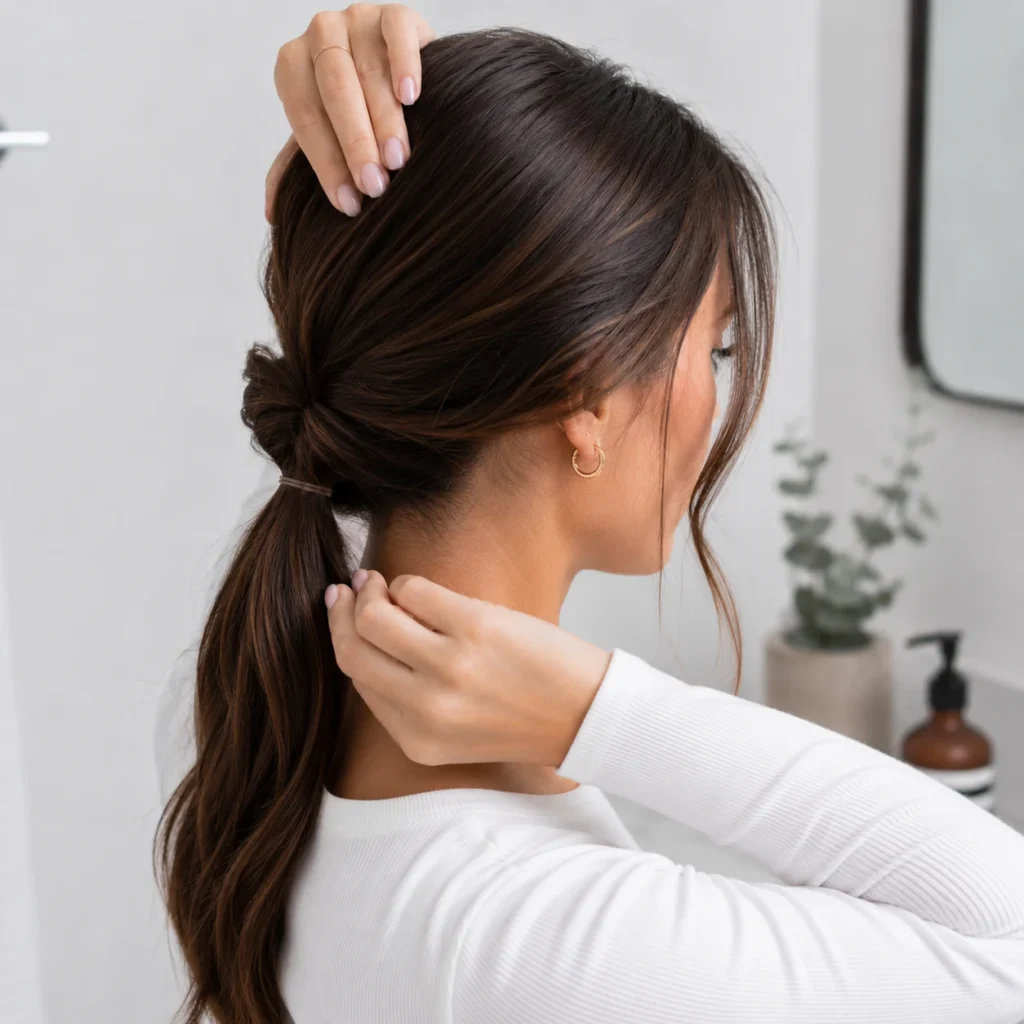
Step 4: Flip the Ponytail Up and Through
Time: 20 seconds
Take your ponytail and fold it up and over your head. Then tuck the tail down through the hole you just made — feeding it through from top to bottom.
Pull the tail all the way through and tug downward gently. You’ll see the hair above the elastic twist into a neat braided-looking knot. This is the magic moment — it suddenly looks expensive.
Step 5: Tighten and Smooth the Top
Time: 20 seconds
Hold the tail with one hand and gently pull the elastic downward with the other. This tightens the twist and pulls the entire updo snug against the back of your head.
Smooth the top of your head with your free hand to remove any bumps. If you have flyaways, a tiny bit of hair oil or styling cream on your fingertips, smoothed across the crown, will fix them.
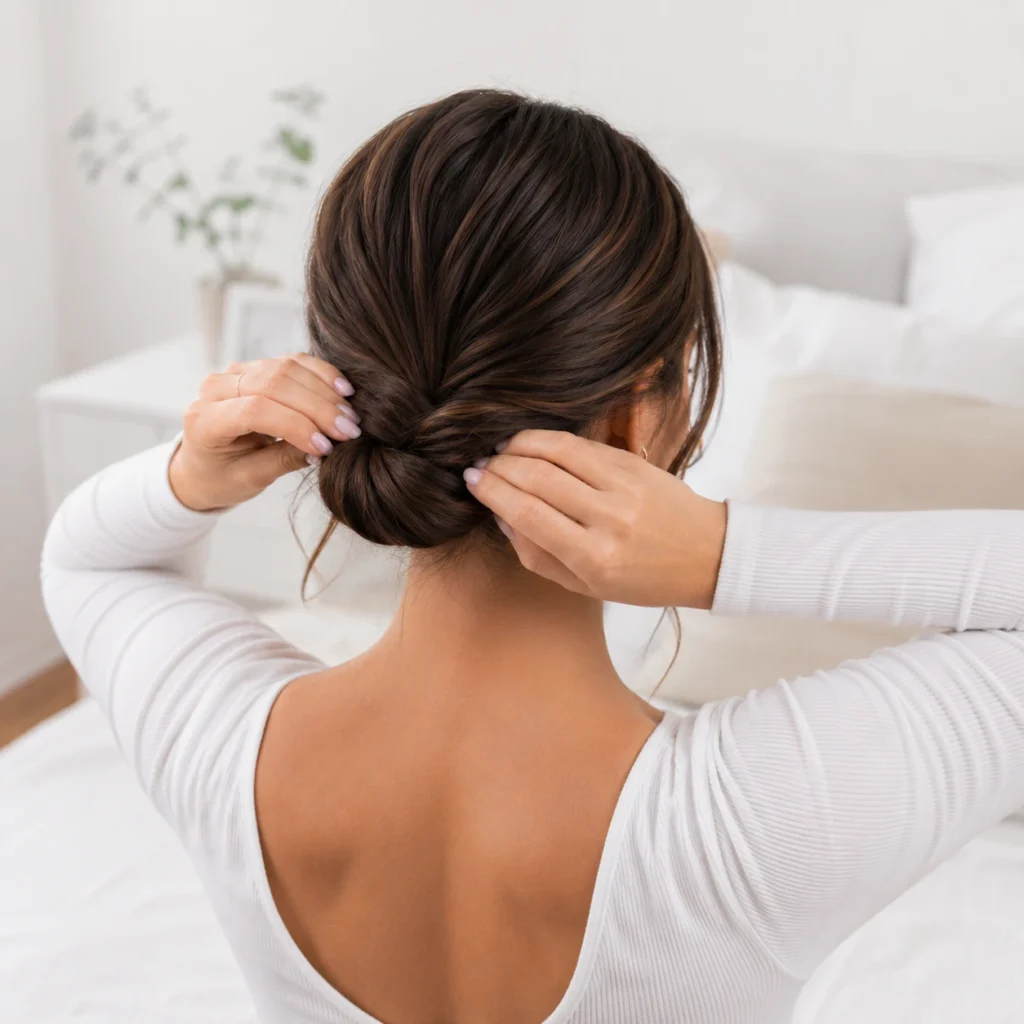
Step 6: Roll the Remaining Tail Into a Bun
Time: 45 seconds
Grab the remaining ponytail tail and twist it loosely along its length (don’t twist too tight — you want it to stay soft).
Then roll the twisted tail up toward the base of the ponytail, forming a loose bun shape against the back of your head. You’ll naturally end up with a low chignon sitting right at your nape.
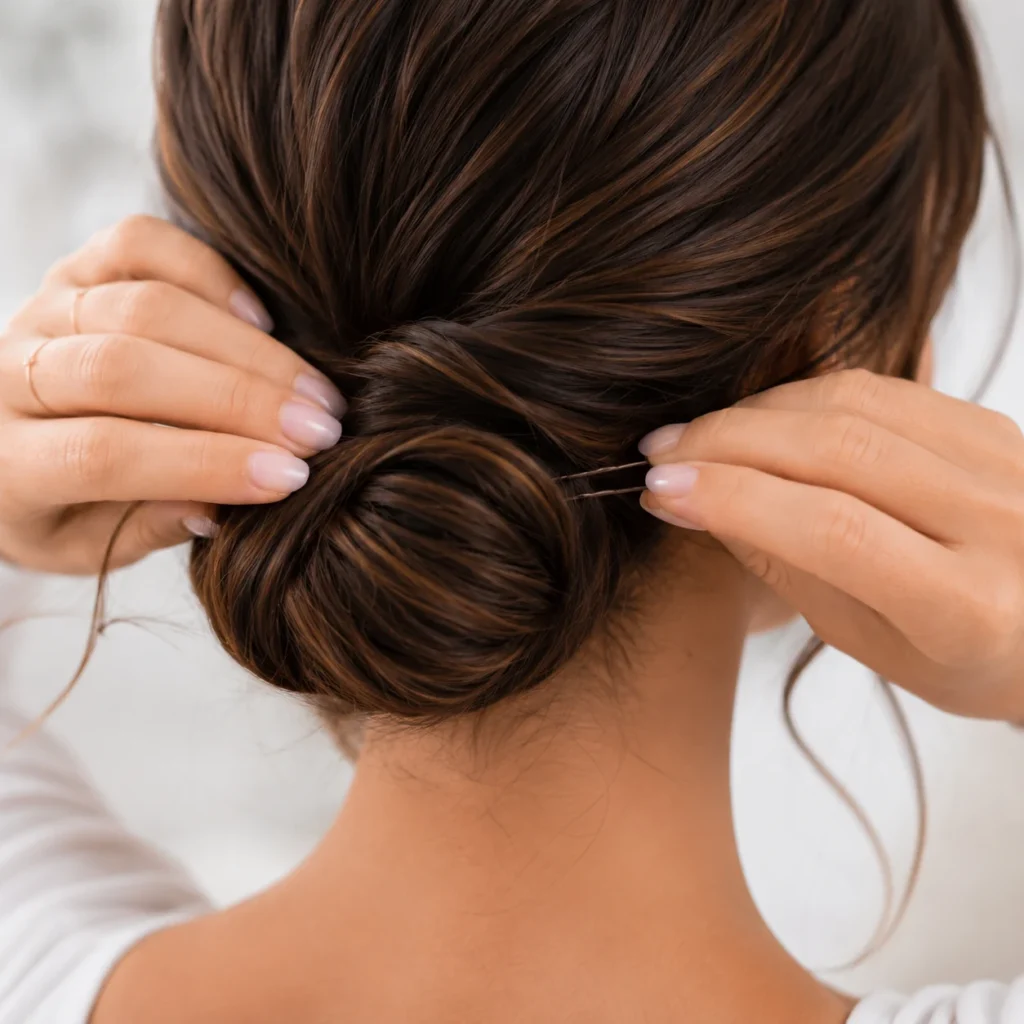
Step 7: Pin the Bun in Place
Time: 60 seconds
Use 3-4 bobby pins to secure the bun. Place pins where the bun meets your head, pushing them in horizontally so they grip both the bun and the hair underneath. Per Bob + Paige Salon’s stylist guidance, use bobby pins that match your hair color so they disappear.
Pro tip: open each bobby pin slightly before pinning, then close it after — this gives a much stronger grip. If you have very long or thick hair, you may need 5-6 pins.
If you have a stubborn piece of hair poking out, tuck the end under the bun and pin again. Don’t fight messy texture — a slightly loose finish is the 2026 look.
Step 8: Soften, Set, and Finish

Time: 60 seconds
With your fingers, gently pull a few small pieces loose around your face — at the temples and behind the ears. This softens the look and makes it feel intentional rather than severe.
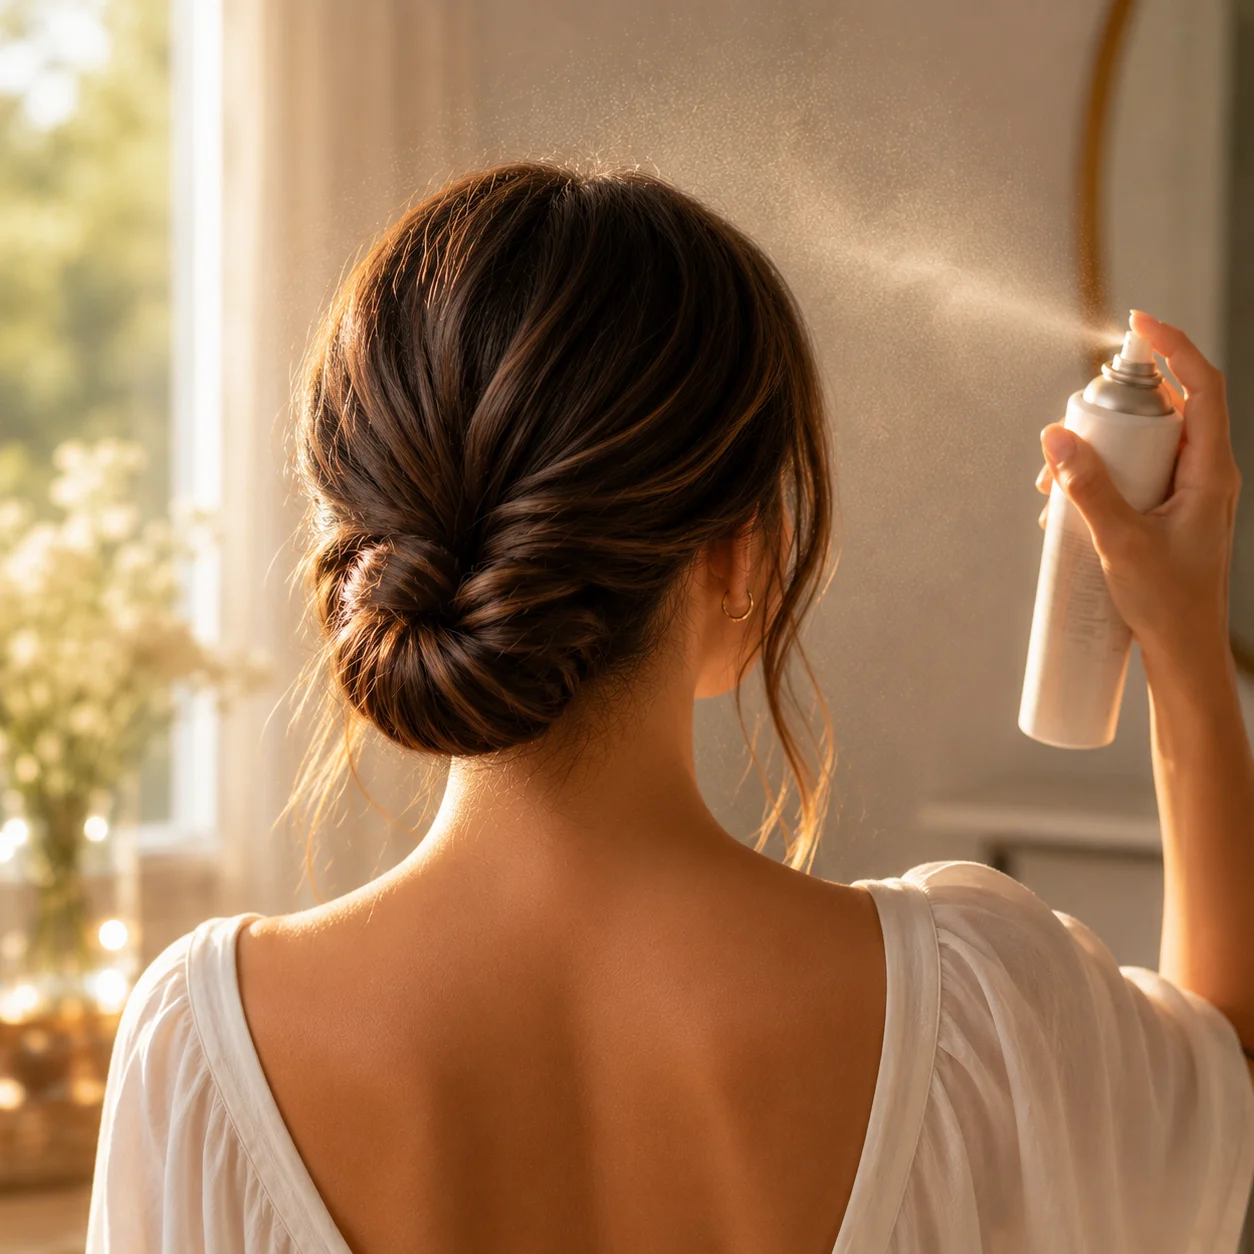
Lightly mist with hairspray. Hold the can about 12 inches from your head. A flexible-hold or texture spray works better than a stiff hairspray here — you want the bun to hold but stay touchable.
Done. Look in the mirror and check the back with your phone camera flipped to selfie mode.
Quick Troubleshooting
The bun keeps falling out: Your hair is too slippery (too clean) or your bobby pins are sliding through. Try dry shampoo at the roots, and make sure bobby pins are placed perpendicular to the hair shaft rather than parallel.
There’s a weird bump or gap above the elastic: Your topsy-tail flip wasn’t centered. Loosen the elastic slightly, smooth the hair around the gap with your fingers, then re-tighten.
The bun looks too tight and severe: Gently pull a few pieces loose at the crown and around the bun itself. The 2026 lived-in look is the goal — never poker-straight perfection.
My hair is too short: If you have shoulder-length hair or shorter, do this updo at a lower starting point and use more bobby pins. For chin-length bobs, try the half-up version: only gather the top half of your hair and do the topsy-tail with that section.
My hair is super thick or super long: Split the ponytail into two sections before rolling so it’s easier to manage. Use 6-8 bobby pins instead of 3-4.
When to Wear This Updo
The beauty of the twisted low chignon is its range — it works almost anywhere:
- Work and office days (especially video calls, where back-of-head detail goes unnoticed and front polish is everything)
- Wedding-guest or dinner events (add a small pearl pin or hair clip to dress it up)
- Hot summer days when you need hair off your neck
- Workouts (you can do this in under 3 minutes with no products if your hair already has grip)
- Bad-hair days when washing isn’t an option
- Travel days when you don’t want to fuss
Final Word
The twisted low chignon is the updo most stylists secretly use when they need to look pulled together in five minutes flat. Master it once, and it’s yours for life — for weddings, for workdays, for emergency morning meetings, for everything in between.
Practice it twice on a slow weekend morning, save these AI prompts and Instagram inspiration to your beauty folder, and the next time you’ve slept through your alarm, you’ll be ready.
Sources
All 2026 quick-updo coverage: Bob + Paige Salon (Senior Stylist Jenna Crawford’s 5-Updos-in-10-Minutes guide), Glamsquad (Easy Updo Hairstyles You Can Do in 5 Minutes or Less), La’ James International College (DIY Easy Updo Tutorial), Verily Magazine (10 Quick and Easy Hairstyles for Updo Newbies), Style of Sam (Easy Five-Minute Updo), Allwomenstalk Hair (15 Easy and Quick Updos to Do in 5 Minutes or Less), Busbee Style (5 Quick and Easy Updo Hairstyles).